Routimator is an advanced state machine plugin designed for Virt-a-Mate, Voxta, and Timeline. It builds on the MacGruber state machine (heavily modified) to serve as a powerful navigation layer between Timeline animations and Voxta states. Using a breadth-first search (BFS) algorithm, Routimator finds the shortest valid path from a starting state (or animation) to a target state, automatically triggering the necessary transitions along the way.
Check out our Routimator Diagram Visualizer to better understand how it works: https://doc.voxta.ai/diagram.html
Key Features
-
Advanced State Navigation:
Routimator uses a BFS algorithm to determine the shortest path between states. For instance, transitioning from a bedroom sitting animation to a bathroom shower animation may involve several intermediate states and transitions that the plugin will execute in sequence. -
Seamless Integration:
If a state’s name matches a timeline animation name, Routimator automatically plays that animation—eliminating the need for additional triggers. -
Flexible Transition Logic:
Define custom transition paths by setting which states can lead into others. This gives you the power to create very complex logic chains across numerous timeline animations. -
Voxta Flag Management:
When navigation is active, the plugin automatically sets a special Voxta flag (nav). This flag can be used to block conflicting actions until navigation is complete. Once the destination state (a looping state) is reached, the plugin unsets the flag (using!nav), allowing your character to resume other actions.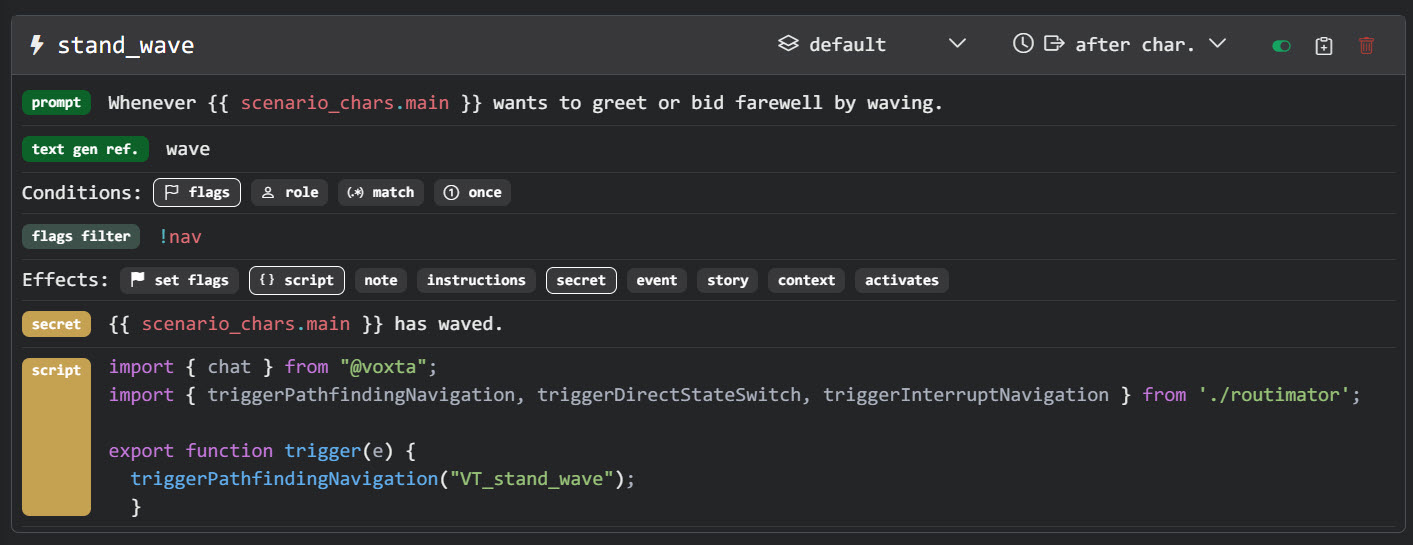
-
Grouping & Organization:
Group states based on context (e.g., different rooms or poses). For example, you might have a “sitting” group and a “standing” group, each with its own transition logic. -
Save and Load Presets:
Easily save your state and transition configurations as presets, and load them back later. This is particularly useful when working with complex scenes or when sharing setups with others. -
Interrupt Navigation:
If a navigation route becomes too long or if you need to abort a transition mid-route, an “Interrupt Navigation” command allows you to stop the routing process. The plugin will halt routing once it reaches the first looping state (prefixed withVS_).
Core Concepts
1. Loop Animations vs. Transition Animations
- Loop Animations:
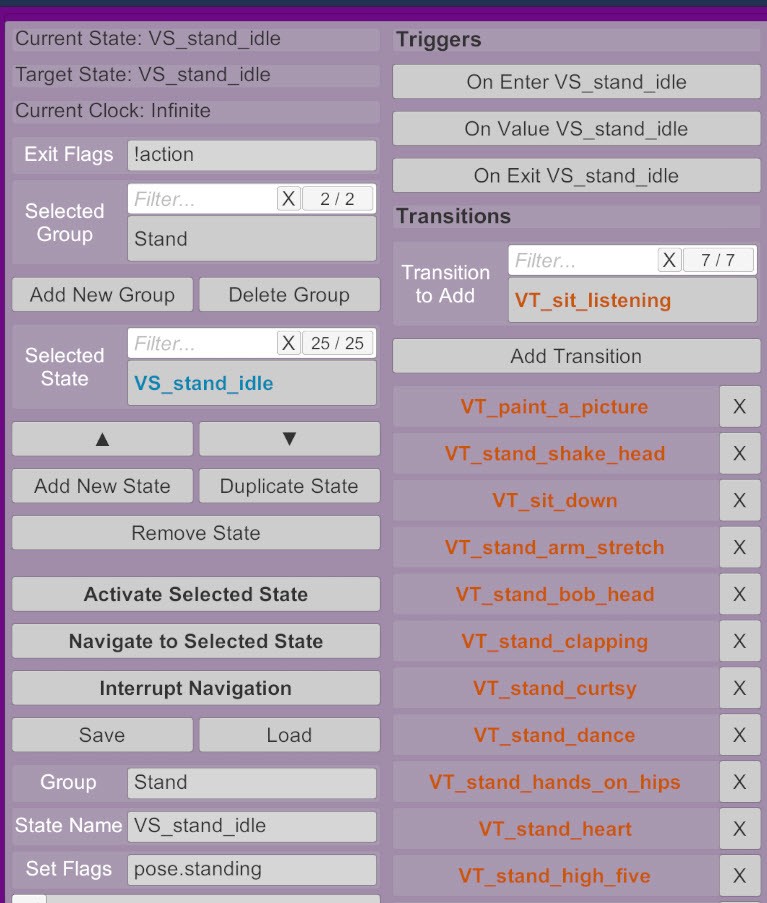
These are continuous animations (or states) that the character remains in for a duration (e.g.,VS_bedroom_bed_sitting). They are generally marked with the prefixVS_and displayed in blue. - Transition Animations:
These serve as intermediary steps that help bridge the gap between loop animations. They are marked with the prefixVT_and appear in orange. For example, transitioning from a sitting state to a standing state might require aVT_stand_upanimation.
2. Naming Conventions
- VS_ (Voxta State):
Use this prefix for looping animations or states (e.g.,VS_bedroom_bed_sitting,VS_bathroom_shower). - VT_ (Voxta Transition):
Use this prefix for transition animations that guide the navigation between loop animations (e.g.,VT_stand_up,VT_go_to_bathroom).
3. Transition Logic
The plugin requires you to explicitly set up which states can transition to which. For example, you might define a path like this:
- Current State:
VS_bedroom_bed_sitting - Intermediate Transitions:
(Set up transitions between states) - Target State:
VS_bathroom_shower
Once these transitions are defined, simply select your current state and target state, then click “Navigate to Selected State”. Routimator will automatically navigate through the chain of animations.
How to Use Routimator
-
Setup Your States and Transitions:
- Add New States:
Use the UI to add new states. The default naming scheme isVS_new_state_Xfor looping states. Duplicate states or rename them as needed. - Define Transitions:
Select a state and add transitions by choosing from available states. This creates the links that the BFS algorithm will follow.
- Add New States:
-
Grouping:
- Organize your states by groups (e.g., different rooms or poses). This allows you to maintain separate transition logic for different parts of your scene.
-
Navigating Between States:
- Manual Switch:
You can manually trigger a state switch. - Route Navigation:
Select your target state and click “Navigate to Selected State”. The BFS algorithm will calculate and execute the shortest route. - Interrupting Navigation:
If necessary, use the “Interrupt Navigation” command to halt routing mid-way.
- Manual Switch:
-
Timeline & Voxta Integration:
- Automatic Animation Play:
When a state name matches a timeline animation, Routimator will trigger that animation automatically. - Voxta Flag Handling:
The plugin sets thenavflag during active navigation to prevent other actions from interfering. Once navigation completes, the!navflag is applied to allow normal operations.
- Automatic Animation Play:
-
Saving and Loading Presets:
- Use the provided save/load UI to store your configuration. This makes it easy to reuse or share complex setups.
Example Use Case
Imagine your character is in a “bedroom sitting” state (VS_bedroom_bed_sitting) and you want to transition to a “bathroom shower” state (VS_bathroom_shower). If the following transitions are set up:
VS_bedroom_bed_sitting→VT_stand_upVT_stand_up→VS_stand_idleVS_stand_idle→VT_go_to_bathroomVT_go_to_bathroom→VS_bathroom_idleVS_bathroom_idle→VT_take_showerVT_take_shower→VS_bathroom_shower
Clicking “Navigate to Selected State” will have Routimator execute each transition in order. If at any point you wish to stop the sequence (for example, if the path becomes too long), click “Interrupt Navigation” to cancel further routing once the next looping state is reached.
Integrating Routimator with Voxta
This guide explains how to integrate the Routimator plugin with Voxta by using a simple JavaScript module. The module leverages Voxta’s chat.appTrigger API to communicate with Routimator, triggering pathfinding navigation, direct state switches, and interrupt actions.
Prerequisites
- Voxta Setup: Ensure Voxta is installed and properly configured in your project.
- Routimator Plugin: Make sure the Routimator plugin is loaded in your scene. Verify that the
atomandstorableidentifiers match your plugin’s configuration.
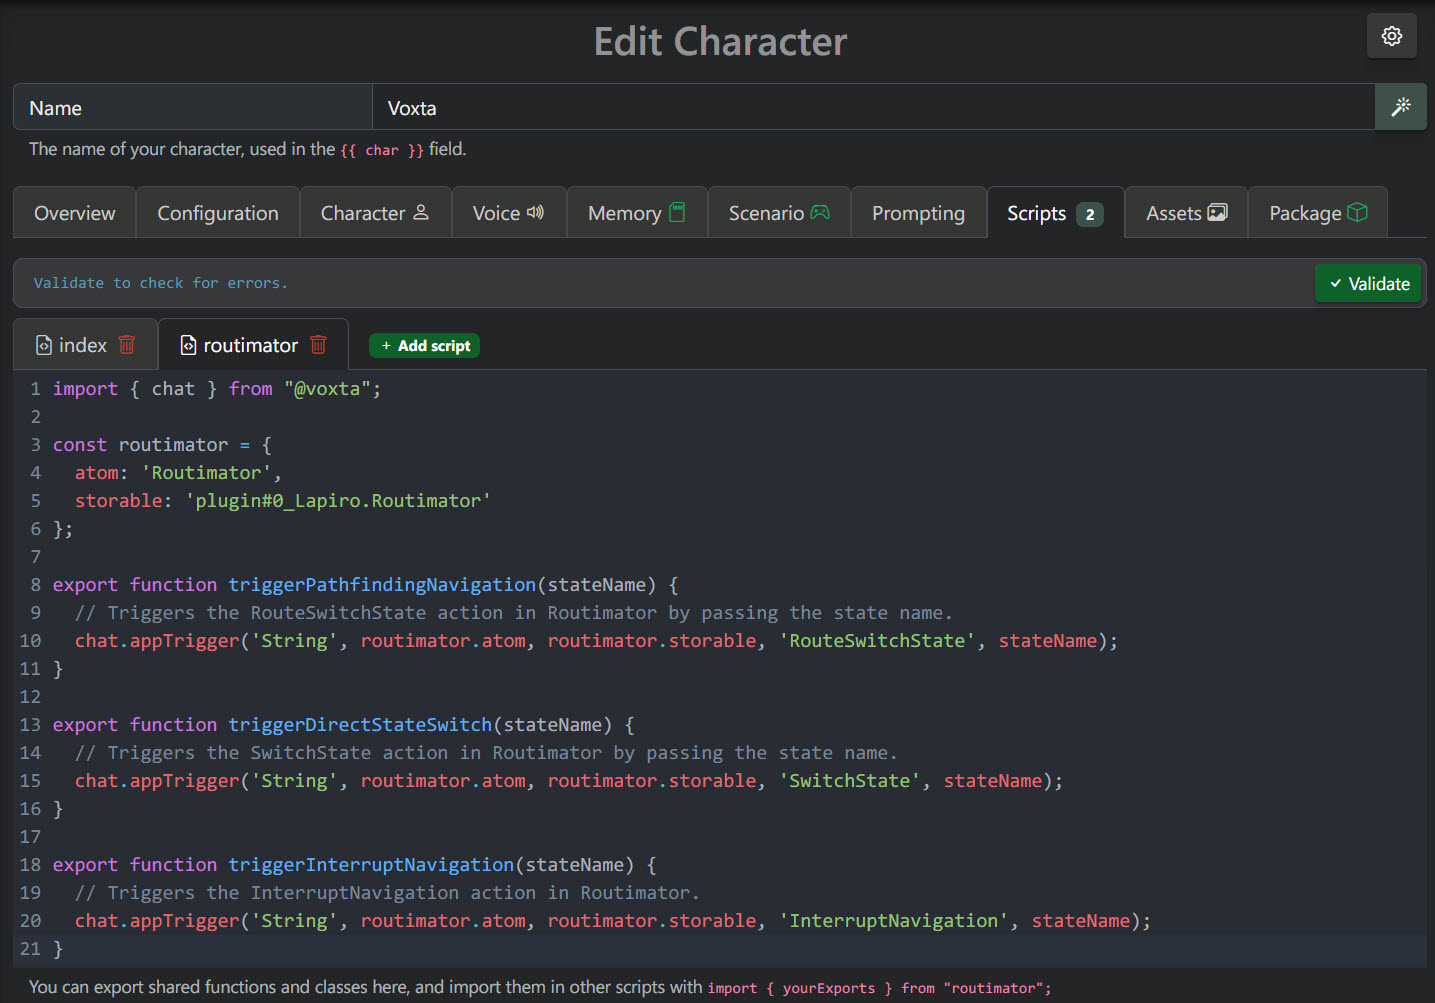
The Voxta Integration Script
Below is the sample code. This module defines three functions:
- triggerPathfindingNavigation(stateName):
Triggers a route-based navigation action (using theRouteSwitchStateaction) to find a path to the given state. - triggerDirectStateSwitch(stateName):
Directly switches the state to the provided state name (using theSwitchStateaction). - triggerInterruptNavigation(stateName):
Interrupts an ongoing navigation process (using theInterruptNavigationaction).
import { chat } from "@voxta";

const routimator = {
  atom: 'Routimator',
  storable: 'plugin#0_Lapiro.Routimator'
};

export function triggerPathfindingNavigation(stateName) {
  // Triggers the RouteSwitchState action in Routimator by passing the state name.
  chat.appTrigger('String', routimator.atom, routimator.storable, 'RouteSwitchState', stateName);
}

export function triggerDirectStateSwitch(stateName) {
  // Triggers the SwitchState action in Routimator by passing the state name.
  chat.appTrigger('String', routimator.atom, routimator.storable, 'SwitchState', stateName);
}

export function triggerInterruptNavigation(stateName) {
  // Triggers the InterruptNavigation action in Routimator.
  chat.appTrigger('String', routimator.atom, routimator.storable, 'InterruptNavigation', stateName);
}
How It Works
Importing Voxta’s Chat Module: The script begins by importing the chat module from Voxta. This module provides the appTrigger function, which is used to send commands to plugins.
Defining the Routimator Object: The routimator object holds two properties:
atom: The name of the atom where Routimator is attached (e.g., “Routimator”). storable: The storable identifier of the Routimator plugin (e.g., “plugin#0_Lapiro.Routimator”). Make sure these values match your setup. Trigger Functions:
Usage Import the module into your Voxta application or script, and call the appropriate functions with the desired state name. For example:
import { chat } from "@voxta";
import { triggerPathfindingNavigation, triggerDirectStateSwitch, triggerInterruptNavigation } from './routimator';

export function trigger(e) {
// Trigger pathfinding navigation to "VS_bathroom_shower"
triggerPathfindingNavigation("VS_bathroom_shower");

// Or Directly switch to a state
triggerDirectStateSwitch("VS_stand_idle");

// Or Interrupt any ongoing navigation
triggerInterruptNavigation('interrupt_navigation');
}
This script allows you to integrate Routimator’s advanced state machine functionality into your Voxta-powered scenes, giving you full control over animation transitions through simple function calls.
Routimator is ideal for creators who want to connect multiple timeline animations into a cohesive, dynamic scene without manually scripting each transition. Whether you’re setting up a simple sequence or a complex narrative with multiple rooms and poses, Routimator gives you the tools to manage transitions effortlessly.