Methods are blocks of code defined within a class to perform specific actions. Think of them as individual instructions or steps in a manual: when you need a particular action, you call the method, and it executes the set of instructions written inside it. This helps organize code by allowing you to reuse and group related actions, making your code more structured and easier to manage.
Raycasting in VAM
Raycasting is a fundamental technique that lets you detect what’s under the mouse pointer or along a specific direction in your scene. It’s especially useful for interactive plugins—like snapping an object to the floor when you click on it.
Ray: An invisible line cast from a point in a specified direction. Raycast: The process of projecting a ray and checking for intersections with colliders in the scene. Hit Information: If the ray intersects a collider, the returned RaycastHit object contains details like the exact point of collision. Steps to Use Raycasting in Your Plugin:
Generate a Ray: Use the main camera to create a ray from the current mouse position.
Ray ray = Camera.main.ScreenPointToRay(Input.mousePosition);
Perform the Raycast: Call Physics.Raycast to check if the ray hits any colliders within a maximum distance.
RaycastHit hit;
if (Physics.Raycast(ray, out hit, 1000f))
{
    // hit.point now holds the world-space coordinates of the collision.
}
Use the Hit Data: For example, if you want to move an atom to the point where the ray hits (such as snapping a Cube atom to the floor), you can do the following:
Atom cubeAtom = SuperController.singleton.GetAtomByUid("Cube");
if (cubeAtom != null)
{
    cubeAtom.transform.position = hit.point;
    SuperController.LogMessage("Cube atom snapped to: " + hit.point);
}
else
{
    SuperController.LogError("Cube atom not found.");
}
Complete Example: This plugin (SnapCubePrecisePlugin) demonstrates how to precisely reposition an atom using raycasting in a VaM scene. When the plugin initializes, it retrieves an atom with the UID “Cube” and sets up a JSONStorable toggle (“EnableSnap”) for activating snap mode. When snap mode is enabled and the user clicks the left mouse button, the plugin casts a ray from the main camera through the mouse pointer into the scene. If the ray hits a collider, it clears the Cube’s parent (so any container offsets are removed) and then retrieves the Cube’s main control node via its “control” storable. The plugin then moves that control node to the raycast hit point, effectively snapping the Cube to the clicked position. This method ensures that the Cube is positioned accurately by working in world space and accounting for potential offsets.
using System.Collections;
using UnityEngine;

public class SnapCubePrecisePlugin : MVRScript
{
    private JSONStorableBool enableSnap;
    private Atom cubeAtom;

    public override void Init()
    {
        // Create a toggle to enable/disable snap mode.
        enableSnap = new JSONStorableBool("EnableSnap", false, OnEnableSnapChanged);
        RegisterBool(enableSnap);
        CreateToggle(enableSnap, false);

        // Attempt to retrieve the Cube atom by its UID.
        cubeAtom = SuperController.singleton.GetAtomByUid("Cube");
        if (cubeAtom == null)
        {
            SuperController.LogError("Cube atom not found. Ensure an atom with UID 'Cube' exists.");
        }
    }

    private void OnEnableSnapChanged(bool value)
    {
        if (value)
            SuperController.LogMessage("Snap mode enabled. Click on the floor to snap the Cube.");
        else
            SuperController.LogMessage("Snap mode disabled.");
    }

    // Update is not marked as override since MVRScript doesn't have a virtual Update.
    public void Update()
    {
        if (enableSnap.val && Input.GetMouseButtonDown(0))
        {
            // Cast a ray from the main camera based on mouse position.
            Ray ray = Camera.main.ScreenPointToRay(Input.mousePosition);
            RaycastHit hit;
            if (Physics.Raycast(ray, out hit, 1000f))
            {
                // For accurate snapping, clear the atom's parent (if any) so that world position is applied directly.
                cubeAtom.ClearParentAtom();

                // Retrieve the main controller from the Cube's storables.
                FreeControllerV3 mainController = cubeAtom.GetStorableByID("control") as FreeControllerV3;
                if (mainController != null)
                {
                    // Move the main controller's transform to the hit point.
                    mainController.transform.position = hit.point;
                    SuperController.LogMessage("Cube snapped to: " + hit.point);
                }
                else
                {
                    SuperController.LogError("Failed to retrieve the main controller for the Cube atom.");
                }
            }
        }
    }
}
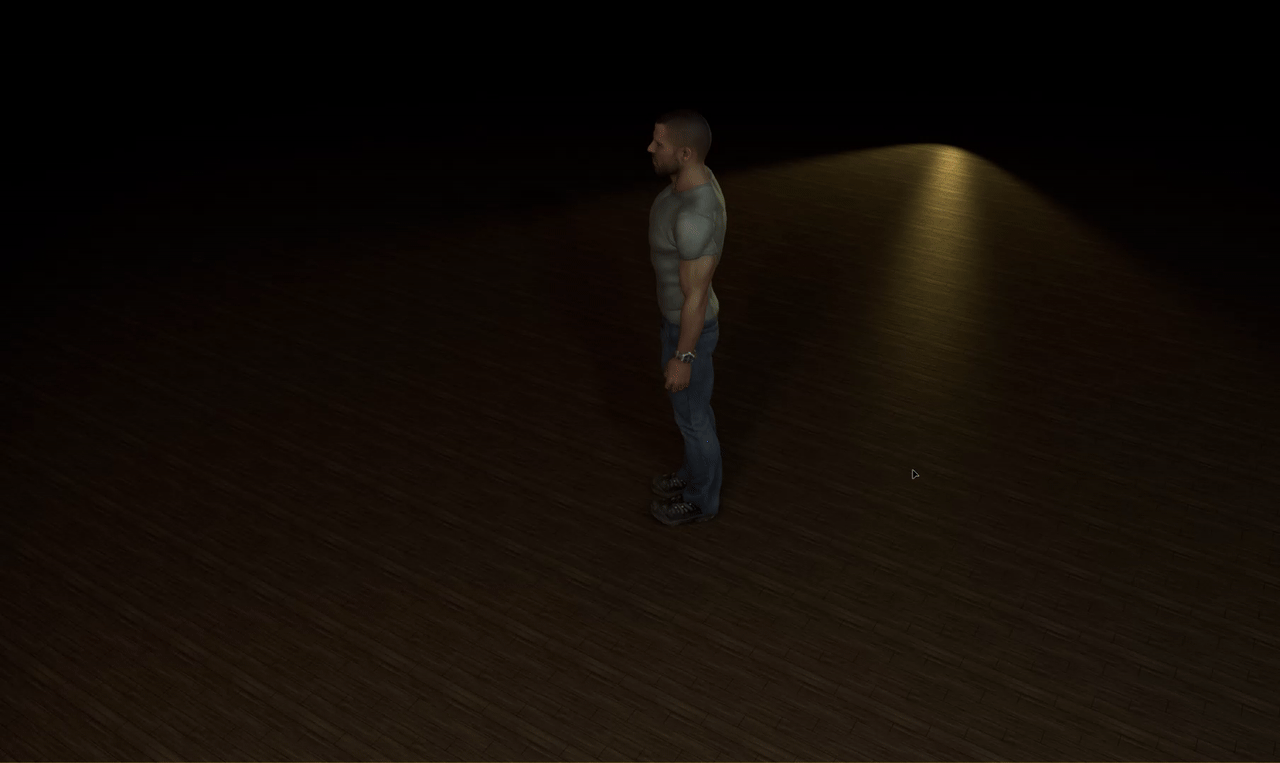
Below is a demonstration of what you can achieve by combining raycasting, hotkeys, and smooth movement using Vector3.Lerp. This plugin lays the foundation for a simple path-finding navigation system in VaM. When you hold down the Ctrl key and left-click on the floor, a ray is cast from the camera to determine the exact point where you clicked. If a collider is hit, any ongoing navigation is interrupted, and the Person atom’s control node is rotated to face the new target using smooth spherical interpolation (Quaternion.Slerp). Then, using a constant speed calculated from the distance to the target, the control node moves toward that point via Vector3.Lerp. This approach not only makes the motion smooth and uniform regardless of the distance but also shows how combining these core techniques can create interactive and responsive navigation systems in VaM.
using System.Collections;
using UnityEngine;

public class InterruptiblePersonPathMovePlugin : MVRScript
{
    private JSONStorableBool enableSnap;
    private JSONStorableBool useCtrlHotkey;
    private Atom personAtom;
    private FreeControllerV3 personController;
    private Coroutine currentNavigation = null;

    // Constant speed (units per second) and fixed rotation duration.
    private const float moveSpeed = 2f;
    private const float rotateDuration = 0.5f;

    public override void Init()
    {
        // Create and register a toggle for snap mode.
        enableSnap = new JSONStorableBool("EnableSnap", false, OnEnableSnapChanged);
        RegisterBool(enableSnap);
        CreateToggle(enableSnap, false);

        // Create and register a toggle to require Ctrl+Click.
        useCtrlHotkey = new JSONStorableBool("UseCtrlHotkey", true, OnUseCtrlHotkeyChanged);
        RegisterBool(useCtrlHotkey);
        CreateToggle(useCtrlHotkey, false);

        // Retrieve the Person atom by its UID.
        personAtom = SuperController.singleton.GetAtomByUid("Person");
        if (personAtom == null)
        {
            SuperController.LogError("Person atom not found. Ensure an atom with UID 'Person' exists.");
            return;
        }

        // Retrieve the main control node of the Person (stored as "control").
        personController = personAtom.GetStorableByID("control") as FreeControllerV3;
        if (personController == null)
        {
            SuperController.LogError("Failed to retrieve the control node of the Person atom.");
        }
    }

    private void OnEnableSnapChanged(bool value)
    {
        if (value)
            SuperController.LogMessage("Snap mode enabled. Click on the floor (with Ctrl if enabled) to move the Person.");
        else
            SuperController.LogMessage("Snap mode disabled.");
    }

    private void OnUseCtrlHotkeyChanged(bool value)
    {
        SuperController.LogMessage("UseCtrlHotkey set to: " + value);
    }

    // Update is used to listen for mouse clicks.
    public void Update()
    {
        if (enableSnap.val && Input.GetMouseButtonDown(0))
        {
            // If the Ctrl hotkey toggle is enabled, require that Ctrl is pressed.
            if (useCtrlHotkey.val && !(Input.GetKey(KeyCode.LeftControl) || Input.GetKey(KeyCode.RightControl)))
                return;

            // Cast a ray from the main camera using the mouse position.
            Ray ray = Camera.main.ScreenPointToRay(Input.mousePosition);
            RaycastHit hit;
            if (Physics.Raycast(ray, out hit, 1000f))
            {
                // If already navigating, interrupt it.
                if (currentNavigation != null)
                {
                    StopCoroutine(currentNavigation);
                    currentNavigation = null;
                    SuperController.LogMessage("Navigation interrupted.");
                }
                // Start a new navigation coroutine.
                if (personController != null)
                    currentNavigation = StartCoroutine(MovePersonToTarget(personController, hit.point));
            }
        }
    }

    private IEnumerator MovePersonToTarget(FreeControllerV3 controller, Vector3 targetPoint)
    {
        // Clear any parent so movement uses world space.
        personAtom.ClearParentAtom();

        // Use current position as starting point.
        Vector3 startPosition = controller.transform.position;
        Vector3 direction = (targetPoint - startPosition).normalized;

        // Calculate target rotation to face the new destination.
        Quaternion startRotation = controller.transform.rotation;
        Quaternion targetRotation = Quaternion.LookRotation(direction, Vector3.up);

        // Smoothly rotate over a fixed duration.
        float elapsed = 0f;
        while (elapsed < rotateDuration)
        {
            controller.transform.rotation = Quaternion.Slerp(startRotation, targetRotation, elapsed / rotateDuration);
            elapsed += Time.deltaTime;
            yield return null;
        }
        controller.transform.rotation = targetRotation;

        // Calculate move duration to maintain constant speed.
        float distance = Vector3.Distance(startPosition, targetPoint);
        float moveDuration = distance / moveSpeed;

        elapsed = 0f;
        while (elapsed < moveDuration)
        {
            controller.transform.position = Vector3.Lerp(startPosition, targetPoint, elapsed / moveDuration);
            elapsed += Time.deltaTime;
            yield return null;
        }
        controller.transform.position = targetPoint;

        SuperController.LogMessage("Person moved to: " + targetPoint);
        currentNavigation = null;
    }
}
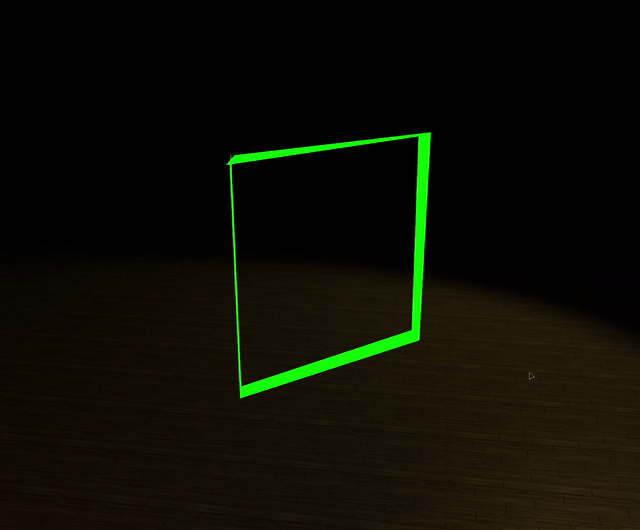
Debug Outline Using LineRenderer (Rectangular Example)
This code demonstrates the core concept of using Unity’s LineRenderer to create a visual debug outline—in this case, a rectangle. Debug outlines like this are useful for verifying collision boundaries, raycast zones, or navigation areas during development.
using UnityEngine;
using SimpleJSON; // Included for MVRScript compatibility.

public class DebugOutlineUsingLineRenderer : MVRScript
{
    // Public properties to define the rectangle.
    public Vector3 rectCenter = Vector3.zero;
    public float width = 1f;
    public float height = 1f;

    // Reference to the LineRenderer.
    private LineRenderer lineRenderer;

    public override void Init()
    {
        // Create a new GameObject for the LineRenderer and parent it to this plugin.
        GameObject go = new GameObject("RectOutline");
        go.transform.parent = transform;

        // Add and configure the LineRenderer component.
        lineRenderer = go.AddComponent<LineRenderer>();
        lineRenderer.useWorldSpace = true;
        lineRenderer.material = new Material(Shader.Find("Sprites/Default"));
        lineRenderer.startColor = Color.green;
        lineRenderer.endColor = Color.green;
        lineRenderer.startWidth = 0.05f;
        lineRenderer.endWidth = 0.05f;

        // A rectangle requires 5 points (closing the loop).
        lineRenderer.positionCount = 5;

        // Initialize the rectangle outline.
        UpdateRectangle();
    }

    private void UpdateRectangle()
    {
        // Calculate the four corners of the rectangle relative to the center.
        Vector3 topLeft = rectCenter + new Vector3(-width / 2, height / 2, 0);
        Vector3 topRight = rectCenter + new Vector3(width / 2, height / 2, 0);
        Vector3 bottomRight = rectCenter + new Vector3(width / 2, -height / 2, 0);
        Vector3 bottomLeft = rectCenter + new Vector3(-width / 2, -height / 2, 0);

        // Set the points of the LineRenderer, closing the rectangle loop.
        lineRenderer.SetPosition(0, topLeft);
        lineRenderer.SetPosition(1, topRight);
        lineRenderer.SetPosition(2, bottomRight);
        lineRenderer.SetPosition(3, bottomLeft);
        lineRenderer.SetPosition(4, topLeft);
    }

    public override void OnDestroy()
    {
        // Clean up the LineRenderer GameObject when the plugin is destroyed.
        if (lineRenderer != null)
        {
            Destroy(lineRenderer.gameObject);
        }
    }

    void Update()
    {
        // Optional: Update the outline in real time if rectCenter, width, or height change.
        UpdateRectangle();
    }
}
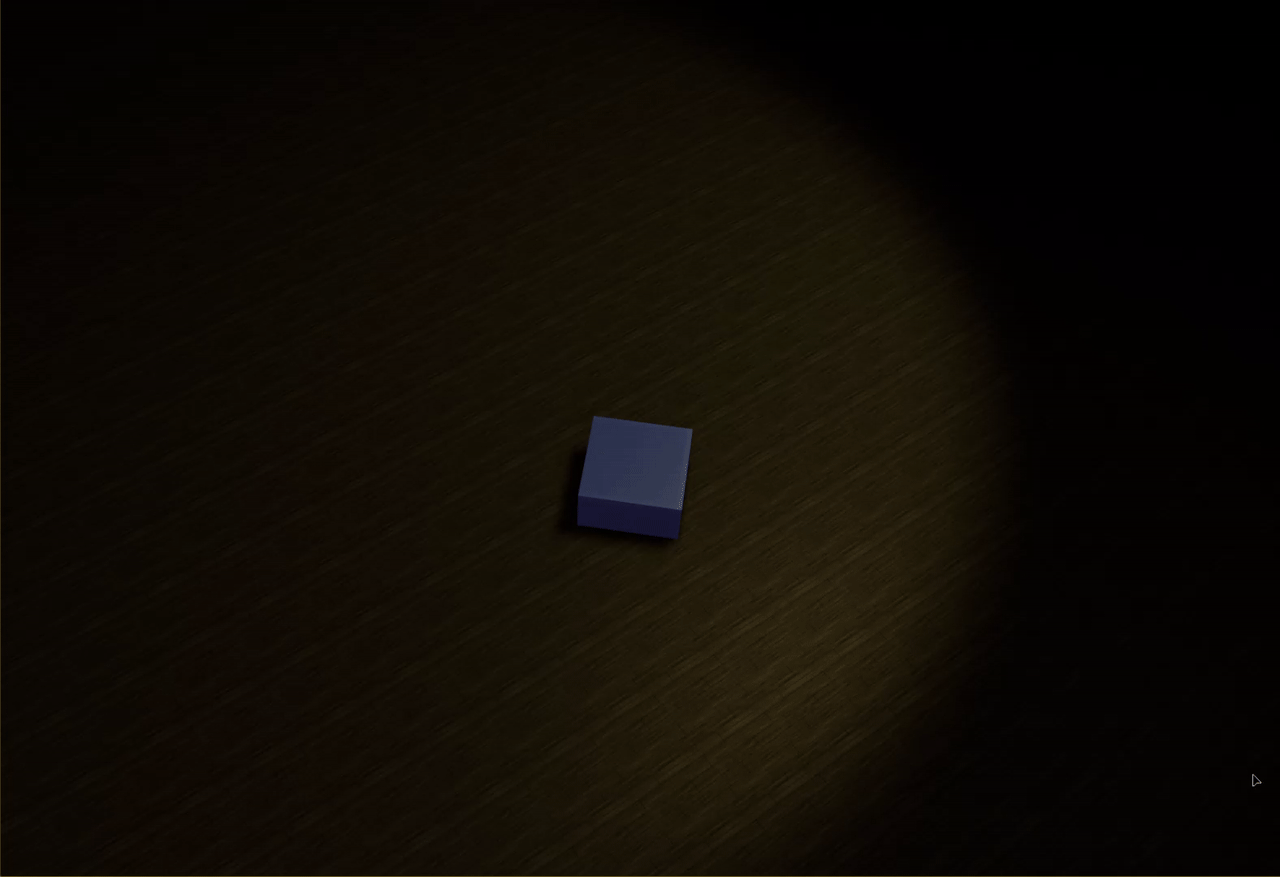
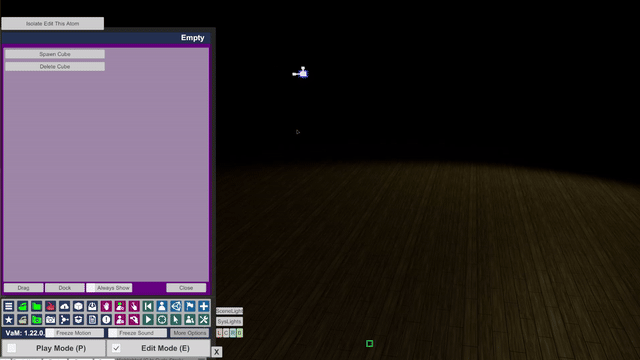
Spawning and Deleting a Cube Atom
This code snippet demonstrates how to manage an atom in Virt-A-Mate by spawning and deleting a Cube. It includes two JSON-storable buttons: one for spawning a Cube and one for deleting it. The approach ensures that duplicate Cube atoms are not created, and deletion is performed using SuperController’s built-in method to properly remove the atom.
Spawning the Cube Atom When the Spawn Cube button is pressed, the script first checks if an atom with the UID “Cube” already exists. If the Cube is already present, a log message is generated to prevent duplicate creation. Otherwise, the AddAtomByType() method of the SuperController singleton is called to spawn a new Cube atom. This method adds the atom into the scene and integrates it properly within the VaM ecosystem.
Deleting the Cube Atom For the Delete Cube button, the script retrieves the Cube atom by its UID. The DeleteCube() function retrieves the Cube atom and then uses the SuperController’s RemoveAtom() method to delete it. This ensures that all internal references and event handlers are cleaned up correctly, unlike simply calling Destroy(cubeAtom.gameObject). The code uses SuperController’s RemoveAtom() method. This method takes care of all necessary deregistration, cleanup, and internal state updates, ensuring that the atom is safely and properly removed from the scene.
using UnityEngine;
using SimpleJSON;

public class CubeManagementPlugin : MVRScript
{
    // JSONStorableActions for spawning and deleting the Cube atom.
    private JSONStorableAction spawnCubeAction;
    private JSONStorableAction deleteCubeAction;

    public override void Init()
    {
        // Initialize the Spawn Cube action.
        spawnCubeAction = new JSONStorableAction("Spawn Cube", SpawnCube);
        RegisterAction(spawnCubeAction);
        // Create a UI button for spawning the Cube.
        CreateButton("Spawn Cube", false).button.onClick.AddListener(() => spawnCubeAction.actionCallback.Invoke());

        // Initialize the Delete Cube action.
        deleteCubeAction = new JSONStorableAction("Delete Cube", DeleteCube);
        RegisterAction(deleteCubeAction);
        // Create a UI button for deleting the Cube.
        CreateButton("Delete Cube", false).button.onClick.AddListener(() => deleteCubeAction.actionCallback.Invoke());
    }

    // Callback for spawning a Cube atom.
    private void SpawnCube()
    {
        // Check if an atom with UID "Cube" already exists.
        Atom cubeAtom = SuperController.singleton.GetAtomByUid("Cube");
        if (cubeAtom != null)
        {
            // If the Cube already exists, log a message and prevent duplicate creation.
            SuperController.LogMessage("Cube already exists. Duplicate spawn prevented.");
        }
        else
        {
            // Spawn a new Cube atom.
            SuperController.singleton.AddAtomByType("Cube", false, false, false);
            SuperController.LogMessage("Cube spawned successfully.");
        }
    }

    // Callback for deleting a Cube atom.
    private void DeleteCube()
    {
        // Retrieve the Cube atom using its UID.
        Atom cubeAtom = SuperController.singleton.GetAtomByUid("Cube");
        if (cubeAtom != null)
        {
            // Use SuperController's RemoveAtom method to properly delete the Cube.
            SuperController.singleton.RemoveAtom(cubeAtom);
            SuperController.LogMessage("Cube deleted successfully.");
        }
        else
        {
            // Log a message if the Cube does not exist.
            SuperController.LogMessage("Cube is missing. Nothing to delete.");
        }
    }
}
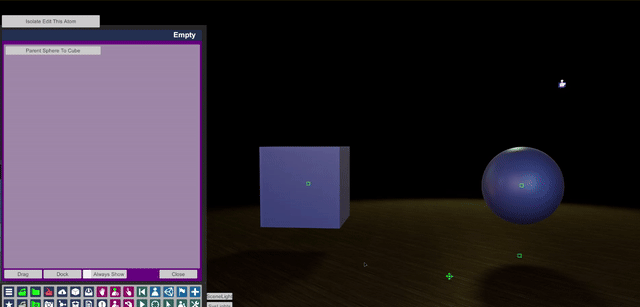
Parent Sphere To Cube
Below is an example Virt-A-Mate plugin script that creates a UI button. When pressed, the script checks for atoms with UIDs “Cube” and “Sphere”, retrieves their control components registered as JSONStorables with the ID “control” of type FreeControllerV3, and then parents the sphere’s control to the cube’s control.
using UnityEngine;
using SimpleJSON;

public class ParentSphereToCubePlugin : MVRScript
{
    private JSONStorableAction parentAction;

    public override void Init()
    {
        // Create a UI button labeled "Parent Sphere To Cube"
        parentAction = new JSONStorableAction("Parent Sphere To Cube", ParentSphereToCube);
        RegisterAction(parentAction);
        CreateButton("Parent Sphere To Cube", false)
            .button.onClick.AddListener(() => parentAction.actionCallback.Invoke());
    }

    private void ParentSphereToCube()
    {
        // Retrieve the Cube atom by UID.
        Atom cubeAtom = GetAtomById("Cube");
        if (cubeAtom == null)
        {
            SuperController.LogError("Cube atom not found in the scene.");
            return;
        }

        // Retrieve the Sphere atom by UID.
        Atom sphereAtom = GetAtomById("Sphere");
        if (sphereAtom == null)
        {
            SuperController.LogError("Sphere atom not found in the scene.");
            return;
        }

        // Retrieve the control components from both atoms.
        // The control is assumed to be registered as a JSONStorable with the ID "control".
        FreeControllerV3 cubeControl = cubeAtom.GetStorableByID("control") as FreeControllerV3;
        if (cubeControl == null)
        {
            SuperController.LogError("Cube control not found.");
            return;
        }

        FreeControllerV3 sphereControl = sphereAtom.GetStorableByID("control") as FreeControllerV3;
        if (sphereControl == null)
        {
            SuperController.LogError("Sphere control not found.");
            return;
        }

        // Retrieve the Rigidbody component from the sphere control.
        Rigidbody sphereControlRB = sphereControl.GetComponent<Rigidbody>();
        if (sphereControlRB == null)
        {
            SuperController.LogError("Sphere control's Rigidbody not found.");
            return;
        }

        // Link the sphere's control Rigidbody to the cube control,
        // applying both position and rotation using the provided API call.
        cubeControl.SelectLinkToRigidbody(sphereControlRB, FreeControllerV3.SelectLinkState.PositionAndRotation);

        // Set the cube control's states to ParentLink so that the sphere's position and rotation are driven by the cube.
        cubeControl.currentPositionState = FreeControllerV3.PositionState.ParentLink;
        cubeControl.currentRotationState = FreeControllerV3.RotationState.ParentLink;

        SuperController.LogMessage("Sphere control successfully parented to Cube control.");
    }
}
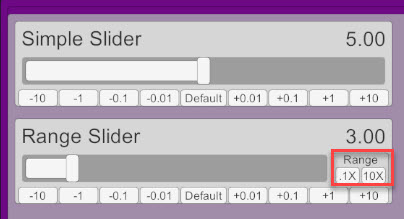
VAM UI Sliders
Below is an example VaM plugin script that creates two sliders: one standard slider and one with range-adjustment enabled (showing the “[x0.1]” and “[x10]” buttons).
using UnityEngine;
using SimpleJSON;

public class SimpleSliderExample : MVRScript
{
    // A simple slider without extra range buttons.
    private JSONStorableFloat sliderSimple;
    // A slider with range adjustment (extra buttons enabled).
    private JSONStorableFloat sliderRange;

    public override void Init()
    {
        // Create and register a JSONStorableFloat for the simple slider.
        // Initial value: 5, range: 0 to 10.
        sliderSimple = new JSONStorableFloat("Simple Slider", 5f, OnSimpleSliderChanged, 0f, 10f);
        RegisterFloat(sliderSimple);
        // Create a standard slider in the VaM UI.
        CreateSlider(sliderSimple, false);

        // Create and register a JSONStorableFloat for the range slider.
        // Initial value: 3, range: 0 to 20.
        sliderRange = new JSONStorableFloat("Range Slider", 3f, OnRangeSliderChanged, 0f, 20f);

        // IMPORTANT: Disable 'constrained' if you want the range to expand
        // beyond the initial 0–20 whenever the user presses [x10].
        // (By default, 'constrained = true' clamps the value within 0–20.)
        sliderRange.constrained = false;

        RegisterFloat(sliderRange);

        // Create the slider UI element.
        UIDynamicSlider rangeSlider = CreateSlider(sliderRange, false);

        // Enable the range adjustment buttons (shows [x0.1] and [x10]).
        rangeSlider.rangeAdjustEnabled = true;
    }

    // Callback for when the simple slider value changes.
    private void OnSimpleSliderChanged(float value)
    {
        SuperController.LogMessage("Simple Slider value: " + value);
    }

    // Callback for when the range slider value changes.
    private void OnRangeSliderChanged(float value)
    {
        SuperController.LogMessage("Range Slider value: " + value);
    }
}
-
Slider without range adjustment: A JSONStorableFloat named “Simple Slider” is created and registered. CreateSlider is called to display the slider in the UI.
-
Slider with range adjustment: Another JSONStorableFloat named “Range Slider” is created and registered. After creating the slider via CreateSlider, the property rangeAdjustEnabled is set to true, which activates the extra “[x0.1]” and “[x10]” buttons. Crucially, if you want the slider’s actual value to exceed its initial max (e.g., go above 20 when pressing “[x10]”), you must set constrained = false on the storable. Otherwise, it will remain clamped within 0–20 even though the UI’s max label increases.